Thursday 6th September 2018

This is a great example of a Golden Low-High setup where the session golden zone was confluent with: –

  • Yes Low
  • Good Role-Reversal Zone (look-left)
  • H1 Bear Channel

Notice how well the Daily and Hourly Grid structure has captured price.

After finding support at the 61.8 level of the golden zone and the H1 Bear Channel (displayed in red and marked with the arrow), price moved back up above the Open and Yes Close to the intersection of the D1 and H1 Bull Channels (displayed in blue).

It is common to see price move between Grid structure like this, the challenge is to profit from it!

Friday 3rd August 2018

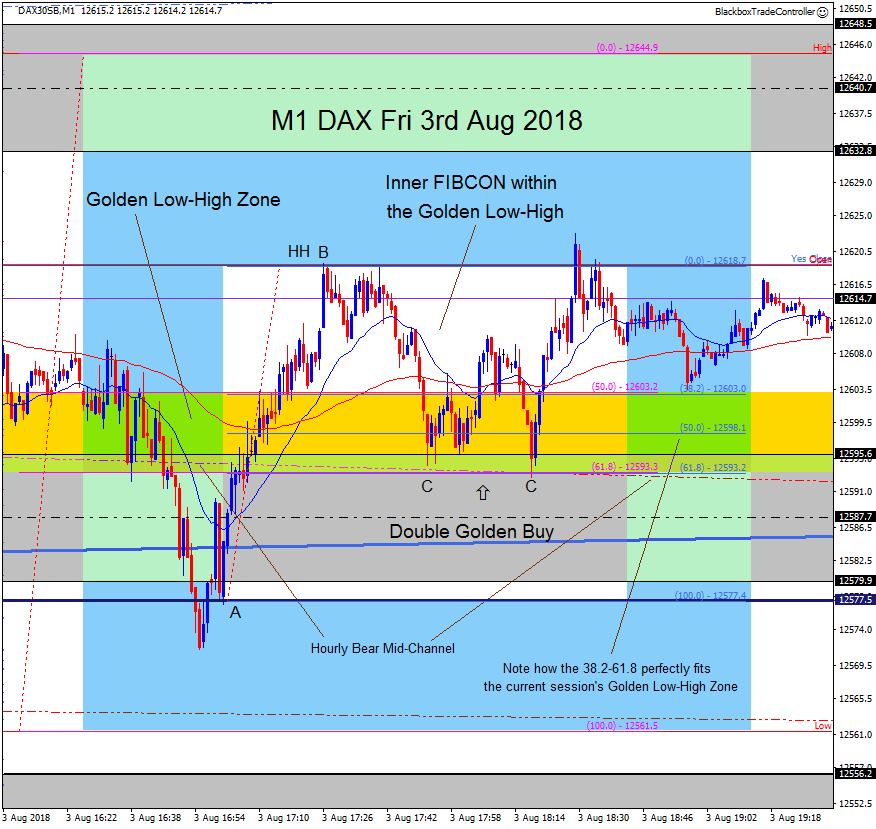
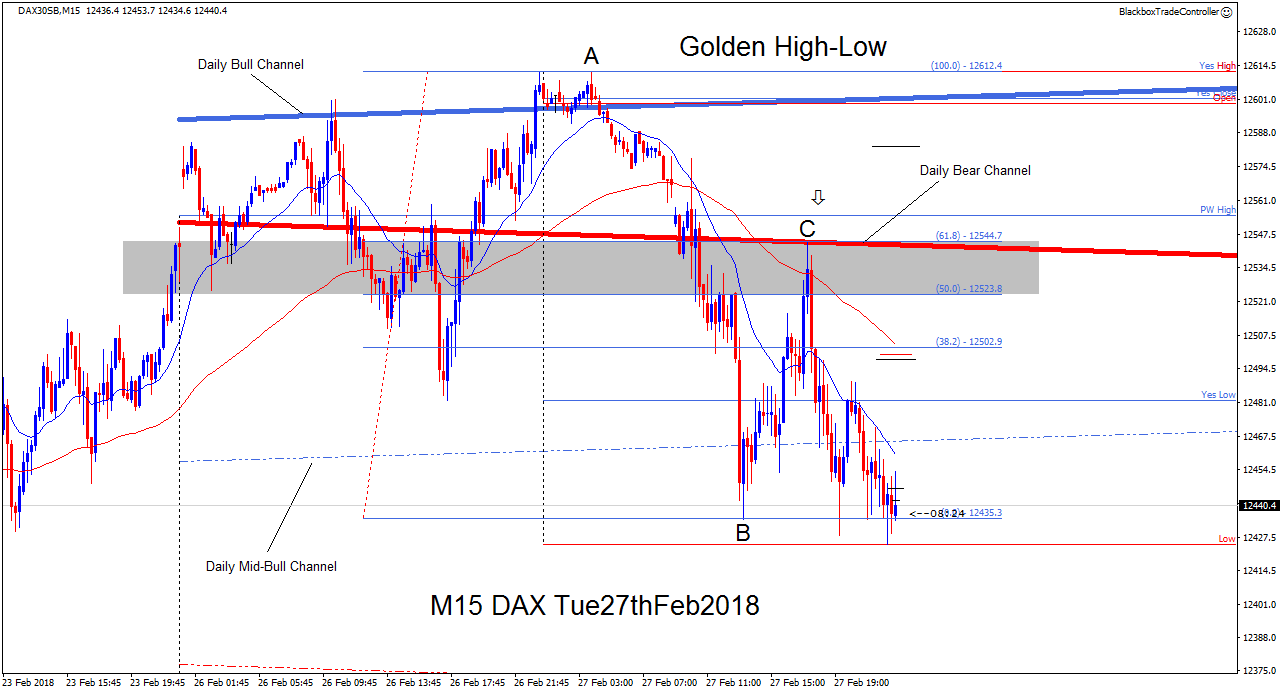
This is a superb example of a Double Golden Buy setup where an inner FIBCON formed within the session Golden Low/High Zone to produce a high probability setup where both 61.8 FIB levels were confluent with each other.

As mentioned previously, the session golden zone is automatically displayed and dynamically updated on the chart as it changes throughout the session. The magenta coloured FIB tool has been added for clarification purposes to show the reference points from the session High to the session Low.

The blue coloured FIB tool shows the inner FIBCON that formed from the Daily Equidistant Key Zone level at 12577.5 (point A) to Yes Close which was confluent with the Open (point B).

Notice how the 38.2 and 61.8 FIB levels of the inner FIBCON are perfectly confluent with the Golden Low-High Zone!

The arrow highlights a great buy zone where point C is confluent with: –

  • 61.8 level of the Golden Low-High Zone
  • 61.8 level of the inner FIBCON
  • Hourly Bear Mid-Channel
  • M5 Equidistant Zone Boundary at 12594

This was an A+++ buy setup that resulted in price moving strongly back up above Yes Close/Open.

Monday 30th July 2018

This is another great example of a Golden Low-High setup where the session golden zone was confluent with: –

  • M5 Bull and Bear Channel intersection
  • M5 Equidistant Zone Mid-Line level at 12800
  • Good Role-Reversal Zone (look-left)
  • Open

This was a great buy setup that resulted in price moving strongly up above Yes Close.

Thursday 26th July 2018

Yet another great example of a Golden Low-High setup where the session golden zone was confluent with: –

  • Yes Close
  • Hourly Bear Mid-Channel (not shown)
  • M5 Bear Channel (not shown)
  • Good Role-Reversal Zone (look-left)

This was a great buy setup that resulted in price moving strongly back up to the session high.

Friday 20th July 2018

This was a Grade A Golden High-Low setup.

As mentioned previously, the session golden zone is automatically displayed and dynamically updated on the chart as it changes throughout the session. Therefore the Golden High-Low Zone shown in the screenshot was taken from the session high to the session low at that time which was at 12557.1.

The session golden zone was confluent with: –

  • PW High
  • M5 MAB
  • Additional Grid Structure (not shown)

This was a Grade A sell setup that resulted in price moving strongly down to make a new session low.

With price making a new session low, the Golden High-Low Zone was automatically updated accordingly as shown in the screenshot above. As can be seen, price retraced to the 50 FIB level of the updated session golden zone.

Notice how the 38.2 FIB level of the updated session golden zone is the same level as the previous session low at 12558.0

Yet more evidence of Fibonacci ratios and symmetry embedded in the price action of the charts.

Wednesday 18th July 2018

This is yet another Grade A Golden Low-High setup where the session golden zone was confluent with: –

  • Yes High
  • M15 MAB
  • Daily Bull Channel (not shown)
  • M5 Equidistant Zone Boundary at 12738.6 (not shown)

This was a great buy setup that resulted in price moving strongly back up towards the session high.

Tuesday 27th February 2018

This is a great example of a Golden High-Low setup where the session high at point A was confluent with Yes High, which is just above the Daily Bull Channel Boundary (displayed in blue).

Price sold off to produce a new session low at point B before retracing to the Daily Bear Channel Boundary (displayed in red) at point C, which is just below the PW High.

This was a Grade A sell setup that resulted in price moving strongly back down to the session low.