Thu 23rd Aug

Welcome to the daily DAX commentary where we share with members our unique take on Price Action as the session unfolds. We comment on trade setups that conform to our trading edge and how we use the hybrid Blackbox Trade Controller for MT4.

Use the comments section below to post questions and read what others are saying.

Remember to:

17:36

Buy Winner off H1 Bull Mid-Channel, +2.11R

I had to go out earlier and came back to see price had just tested the H1 Bear Channel again and the top of the M15 keyzone (see below).

It was too late to enter a sell trade but was yet another example of how powerful the Grid channels are. Price sold off all the way down to the H1 Bull Mid-Channel that has been supporting price very well over the last several days.

I therefore decided to watch this and entered a buy trade right on the channel and to my delight price reversed and 42 minutes later my +2.11R winner came in 🙂

The more I’m going deeper into the Holy Grid the more I’m seeing great trade setups that have multiple R potential, they’ve always been there, I guess I’m ready now to see them by displaying and combining the different components of the Grid accordingly.

Below is the M15 chart where the arrows show the power of the H1 Bull and Bear channels.

10:12

GZ M5 Buy MAB loser, -0.97R

I anticipated a sell if price moved up to the H1 Bear Channel boundary at around 12410.0 but took my eye off the ball and just missed it 🙁

It was also confluent with a keyzone I’d marked up on the M15 chart (see below), it proved to be a great sell setup and another great example of the power and potential of the Grid structure to guide us in our trading decisions.

I then took the GZ M5 MAB which was a decent setup BUT on this occasion it looks like the power of the H1 Bear Channel rejection made it a lower probability.

Note that the power of the sell off took price down to just above the H1 Bull Mid-channel, clearly a target for the bears based on Grid structure.

This is shown on the M15 chart below, this shows how the sell setup had multiple R potential.

09:39

Buy trade loser, -1.25R

I missed the correct buy setup  and once price moved above the Golden High-low zone I ended up chasing price 🙁

It briefly looked like I would get away with it but not on this occasion.

Thu 23rd Aug

10:20

GZ M5 FIBCON

M5 Chart

M1 Chart

I guess that if you click on the charts and take a look at it, you might feel as upset as I did! 

Marked a good M5 FIBCON right after the volatility of the London open vanished, waited for it and pressed Ctrl+E right there, on the edge of a reversal that happened after a short hesitation.

Having the M1 MAB above my entry level wasn’t that exciting, but I decided to let it run at least until it goes above my 1R level. Locked in profit after touching +1.5R (as there was a RR zone looking to the left in the M5 chart), raised my take profit level to the H1 bear channel boundary and left it alone. 

The rest is history. Retraced to my entry level, left me out of the trade and went non-stop to my target. A +3.5R ended up being a +0.08R trade.

Should I have left my stop loss at the original level (-1R)? Did I do right locking profit in order not to lose money in case the trend changed? I don’t know. 

I think the answer could have been: take profit at +1.5R where the RR zone was, see what happens and if it comes back down and you like it, enter another trade. Worst case scenario, you end up +0.5R. In this case, I would have ended securing +4R.


Wed 22nd Aug

Welcome to the daily DAX commentary where we share with members our unique take on Price Action as the session unfolds. We comment on trade setups that conform to our trading edge and how we use the hybrid Blackbox Trade Controller for MT4.

Use the comments section below to post questions and read what others are saying.

Remember to:

12:05

GZ M1 Buy FIBCON

Whilst updating the blog and having a break I’ve just noticed the decent GZ M1 Buy FIBCON as price moved back up. 

The 61.8 at 12383.9 sits perfectly on the top of the M5 EQZ. The measured move projection took it up to the short-yerm keyzone.

11:09

Sell at RESCON Winner, +3.25R

This was pretty much a repeat of yesterdays Sell Limit PO at RESCON. I anticipated the move up once the session low had formed at the area of SUPCON, this was all based on Grid structure.

I was totally ‘The Bear’ and waited patiently for price to try and break above the zone of RESCON. Eventually it did by breaking sharply above the H1 Bull Channel, the RESCON consisted of:

  • H1 Bull Channel
  • H1 Bear Channel
  • H1 EQZ boundary at 12428.2
  • M5 EQZ
  • Yes High
  • D1 Bull Mid-Channel

I used the Trade Tool to enter, my patience was rewarded with a great entry and once again the setup demonstrates how accurate and powerful Grid intersections are!!

I decided to move my target lower based on the power of the possible rejection, I chose the bottom of a zone that I’d marked up on the M15 chart mentioned below at start of todays blog.

After moving between the H1 Bull and Bear channels price eventually broke below the short-term support level to reward me with a +3.25R winner 🙂

My reasoning was identical to yesterday and based totally on Grid structure, let’s continue to go deeper into the ‘Holy Grid’ 🙂 🙂

One comment I’ll end with is how pleased I am that I patiently waited for the push up through the RESCON instead of jumping in earlier and being tempted to move my stop etc., I hope this is something that becomes a great habit and not a one-off!

Below is the H1 chart showing yesterdays and todays sell trades at RESCON. Note the Grid intersection of components listed above.

10:56

Sell Micro-Breakout Winner, +0.21R

After the 8am open price moved up strongly and after yesterdays rejected at major RESCON I was planning to sell again.

However, on the way up price formed a micro ascending triangle from which price pushed on up to test perfectly the H1 Bull Channel. When price reversed there was some short-term weakness supported by the M5 chart.

I sold as shown and almost got a very quick 2R winner and should have locked in more profit due to the bullish context. Such fine margins once again.

This was a CT trade that I got right BUT not the type I felt is a WTA. There was certainly a bit of FOMO involved after the rejection at the Bull Channel but I felt I managed it well by moving my stop to at least below trade entry.


10:26

GZ M1 Buy MAB Loser, -1.01R

I sat down at my desk at 06:55am, later than usual and my first trade reflected not following my plan!!

I did not look closely at the Grid on the M15 and H1 charts before 7am and asking myself some basic questions before considering an early trade.

I only looked at M1 chart and when price gapped up at 7am then moved on up to form a higher-high I put the FIB tool on in auto-pilot as shown. I entered a GZ M1 Buy MAB but it soon failed and price sold off strongly.

I then asked myself what was going on to produce the bear spike? The answer was on the M15 chart (below) and the Grid structure already present.

There was a short-term Golden Sell Zone if you took point A from the H1 Bull Channel and point B at the session low. A few hours earlier price had already entered this zone and reached the 61.8 level to produce the current session high.

I’ve marked the 7am spike up into the zone. Price quickly reversed down to the top of the zone at 12361.0, that’s where I entered the buy trade. 

Had I marked up my M15 chart as shown I may well have talked myself out of the buy trade and considered the sell back down into the zone.

Price then moved down to the bottom of the zone – perfectly – where SUPCON was present in the form of:

  • H1 Bear Mid-Channel.
  • H1 Bull Mid-Channel
  • Open
  • D1 Bear Channel just below the bottom of the zone.
  • H4 MA just below the D1 Bear Channel.

Once again the target was key Grid structure, this was the session low and price moved up strongly from this zone of SUPCON.

Tue 21st Aug

Welcome to the daily DAX commentary where we share with members our unique take on Price Action as the session unfolds. We comment on trade setups that conform to our trading edge and how we use the hybrid Blackbox Trade Controller for MT4.

Use the comments section below to post questions and read what others are saying.

Remember to:

17:45

GZ Sell M5+M15 MAB

After teh break back below the H1 Bull Channel this excellent M5+M15 MAB formed with point C at the BRN of 12400.0!

I was not at my desk but this was a must take trade, I don’t think I could have talked myself out of this one 🙂

13:04

Sell Limit Winner at RESCON, +1.96R

Recently we’ve been talking about going deeper into the Price Action Grid. The only way to do this is to sit and watch price interact with each component as it moves up and down throughout the trading session.

This requires time, commitment and a routine that allows you to do this. This is therefore not for everyone but for those who vibe with this unique approach let the following be a reminder of the potential rewards available.

I’d identified a zone of RESCON and was waiting for price to move up to it where I was considering a sell trade. The RESCON consisted of the following:

  • D1 Bull Mid-Channel. On the screenshot above it’s hidden by the H1 EQZ boundary at 12428.2
  • H1 EQZ boundary at 12428.2
  • M5 EQZ Mid-line at 12429.0
  • M5 Bull and Bear Channel intersection, see screenshot below.

The H1 EQZ level when viewed on the H1 chart (see below) showed how precisely it had held price last week.

I had to leave my desk and decided to use a Sell Limit PO to enter the trade rather than miss it. There are four screenshots below with arrows showing the Sell at RESCON:

  • M1 Chart. This shows the Sell Limit PO, I used a wider stop-loss than normal to allow for overshoot. This meant my 2R was at 12396.0, however, due to the slippage that occurred when triggering the PO the 2R ended up right on the H1 Bull Channel 🙂
  • M5 Chart. This shows the M5 Bull and Bear Channel intersection along with the M5 EQZ mid-line and the H1 EQZ level.
  • M15 Chart. This shows the same levels along with a measured move projection. See the magenta coloured lines and how the top of the second one is at the area of RESCON.
  • H1 Chart. Look-left to see the previous times price moved up to the H1 EQZ level at 12428.2. Arrows are used to show how precisely the Grid channels price.

These screenshots show how important and powerful the different perspectives each timeframe provide are. They also demonstrate how the Trade Controller environment allows the user to overlay the Price Action Grid in anyway they find useful.

We are currently updating the Price Action Grid section of the website to reflect all of this in more detail.

M1 chart below.

M5 chart below.

M15 chart below.

H1 chart below.

Mon 20th Aug

Welcome to the daily DAX commentary where we share with members our unique take on Price Action as the session unfolds. We comment on trade setups that conform to our trading edge and how we use the hybrid Blackbox Trade Controller for MT4.

Use the comments section below to post questions and read what others are saying.

Remember to:

10:52

Done for the day….

After price reached the D1 Bear Channel it pulled back to a Golden Buy Zone as shown. The M5 Bull Channel Mid-line was supportive of buying at this level, below is the M5 chart, the arrow shows the mid-bull channel mentioned.

I was not at my desk when this took place and am now done for the day. I’m happy to lock in 2R from the early breakfast 🙂

We worked over the weekend to update the software to auto detect and download updates to the Grid structure and also produce three updated videos that highlight how cool the Price Action Grid is!

Time for a ride as the weathers decent but due to change tomorrow onwards.

10:33

Bullish session so far….

There was a GZ M5 Buy MAB just after 8am which proved to be the best chance to get on the bull move. 

The move back above the H1 bull channel just before 7am was a clue to price wanting to go higher??

It’s currently at the D1 bear channel around 12342.0


07:15

Perfect Golden Low-High Buy Winner, +2.08R

At 7am price gapped to the H4 MA for an untradable MAB.

I quickly marked up the buy setup to see the 61.8 was confluent with the current Golden Low-High zone at Yes Close+Open.

I took the buy trade on the retrace and 9 mins later a 2R winner at 07:12 am 🙂

I was tempted to push for more at Yes High but decided to take the 2R to start the week.

After seeing a few of these early Golden Zone setups recently I was ready at 7am and anticipating an early breakfast, this was a perfect one and glad to have caught it 🙂 🙂

Fri 17th Aug

Welcome to the daily DAX commentary where we share with members our unique take on Price Action as the session unfolds. We comment on trade setups that conform to our trading edge and how we use the hybrid Blackbox Trade Controller for MT4.

Use the comments section below to post questions and read what others are saying.

Remember to:

14:32

GZ M1 MAB But Loser, -0.80R

I should have stayed in sell mode and sold the move back up to the D1 Bear mid-channel.

Instead I took the GZ M1 Buy MAB on the retrace back to the H1 EQZ level at 12154.6, not a good call.

14:24

Sell Breakout, +4.42R Winner

After waiting for price to reach the Golden High-Low zone for a sell I took a sell after price moved back down.

I trailed my stop and once again pushed for more profit as it felt very bearish and if price pushed down through the PM Low it could go much lower. It was a good trade and I was stopped out for +4.42R.

The BIG lesson for me today has been not to be greedy and use structure to close out respectable profits.

I should have closed out at Yes Low!!!

14:09

Two trades taken at Bull Channel

These two trades were taken at the H1 bull channel, one loser, one winner.

When price broke through taking me out for -0.87R I re-entered with a sell trade on the retrace. Once again, I pushed for more profit instead of being happy with  2R and was over 4R in profit at one stage.

I trailed my stop and was taken out for +0.99R

10:44

Top of Range Sell Winner +0.80R

I took a sell when price moved back up to the top of the range. I was a bit late and once again I trailed my stop too closely.

I did this by eye BUT if I’d been using the the FIBCON as shown to guide me I would have not got stopped out. This is a great example of using the FIBCON structure to be more precise when trailing the stop.

10:38

GZ M1 Buy MAB Loser +1.06R

This was not a high quality trade, compared to the first two, Would-not take-again!

It was mid-range but was off the top of the Golden Low-High zone.

10:20

Buy off SUPCON Winner +0.23R

Took buy trade off area of SUPCON:

  • H1 Bull channel
  • H1 Bear Mid-Channel
  • H1 EQZ Mil-line at 12218.6
  • M5 EQZ Mid-Line at 12217.4
  • Monthly MAB
  • 61.8 level from M15 chart

I got a poor entry, my 2R should have been just above Yes Close. Once again I trailed my stop as often the move back up an area of SUPCON like this can be strong.

As shown, once again I trailed my stop too closely and only got  +0.23R.

The setup was excellent, I’d reasoned it out well in advance, a 100% WTA.


10:10

Early Golden Low-High Buy Winner +0.71R

Price gapped up at 7am then sold off quickly down to Yes Close and the Open. This was the bottom of the current Golden Low-High zone so took a buy trade.

I should have taken the 2R but was trailing my stop in case the move backup out of the zone had bullish momentum.

I was stopped out for +0.71R, a good trade, the better option was to settle for 2R.


Thu 16th Aug

Welcome to the daily DAX commentary where we share with members our unique take on Price Action as the session unfolds. We comment on trade setups that conform to our trading edge and how we use the hybrid Blackbox Trade Controller for MT4.

Use the comments section below to post questions and read what others are saying.

Remember to:

07:36

Early GZ M5 Buy MAB

The energy of the 7am Open often produces good setups.

This is a great example, the spike down at 7am was followed by a move up that did not produce a Higher-High BUT look at where the Golden Zone formed.

Perfectly confluent with:

  • M5 EQZ Mid-line at 12217.4
  • H1 EQZ Mid-line at 12218.6
  • M5 MAB
  • 61.8 level at 12217.3

Look-left to see a great short-term Role-Reversal zone. To spot these these requires being ready and in-the-zone at 7am. Then watch closely as price moves up and down as the energy of the open is injected into the market.

This setup was very good despite no Higher-High. We must be alert and actively anticipating the possibility of these ‘Juicy Salmon’ appearing to give us an early breakfast 🙂


Wed 15th Aug

Welcome to the daily DAX commentary where we share with members our unique take on Price Action as the session unfolds. We comment on trade setups that conform to our trading edge and how we use the hybrid Blackbox Trade Controller for MT4.

Use the comments section below to post questions and read what others are saying.

Remember to:

16:47

Pleased with todays trading 🙂

Following on from yesterdays poor performance I’m pleased with how today went. Another four straight losers was not a good start BUT the key difference was the trades were reasoned out, they just didn’t work out, see below.

To then have two winners by being consistent in my approach and end the day with a small profit feels good. I controlled my risk and was close to being 2-3R in profit.

Yesterday hit me hard, not from having three consecutive losers but it was the emotional spiral that I experienced. Today I’ve benefited from:

  • Displaying and following my plan.
  • Anticipating setups well in advance.
  • Reducing my risk when the trade moves into profit.
  • Waiting patiently for a value entry which means I wasn’t tempted to move my stop.
  • Being The Bear!!

Onwards and upwards….

16:28

GZ M1 Buy FIBCON off PM Low

After the +2R winner I took a break, however, I should also have been anticipating a reversal FIBCON off such a key level as the PM Low.

I came back to my desk to see that’s exactly what happened and it was superb buy setup as shown. The retrace to the 61.8 level was perfectly confluent with the PM Low, price moved up quickly to the H1 Bear channel to form an M5 Sell MAB.


16:19

M1 Sell MAB Winner, +2.00R

I anticipated the move down to test the PM Low, just below the D1 EQZ mid-line at 12135.7 so once price broke through the H1 EQZ level at 12154.6 I took the M1 Sell MAB that quickly followed.

It played out as anticipated for a nice +2R winner 🙂

This means I’m in profit for the day, the traders equation in action, see below.

16:04

M1 Sell MAB Winner, +0.83R

This setup is the best so far, a proper Juicy Salmon!

I marked up the Role-Reversal zone and got a great entry as shown. It quickly went into profit and in my haste to move my stop I dragged it down to the H1 bull channel boundary and before I had chance to move it back up above the channel I was stopped out for +0.83R, it then went on to hit my 2R target.

Very happy with my anticipation and entry, not so happy with my trade management, should not have rushed it. Maybe after ten consecutive losers I was keen to lock in a profit?

14:39

Missed GZ M5 Sell MAB 🙁

Whilst updating the blog and making a cuppa I misssed this decent GZ M5 Sell MAB!!

With a good entry the 2R was available.

14:25

GZ M1 Buy MAB loser, -0.32R

This trade was again based on a reversal pattern, only this time off the Monthly MAB.

Structurally it was very good, my entry was late otherwise I would have locked in a profit. Instead I trailed my stop to reduce my risk.

I’ve now had ten consecutive losers as a result of yesterdays three howlers. We’ve mentioned how fine the margins are in trading, like golf, tennis, etc.

Today I’m OK with the trades taken, this last one should have been a winner, it was poorly executed. The traders equation will do its thing, one good winner and I’m break-even on the day 🙂

14:17

Just missed Monthly Buy MAB

I was having lunch when price moved down to the Monthly MA to produce a rare MAB.

When I returned to see it positioned the Trade Tool as shown just as price moved back up above the two mid-lines, a sort of micro FIBCON.

If I’d been at my desk maybe I would have taken it??

12:40

Buy loser -1.01R

This was a CT trade based on price reversing back up due to a combination of:

  • D1 Bull Channel
  • H1 Bull Mid-Channel
  • D1 EQZ level at 12282.6
  • H1 EQZ level at 12282.4
  • M5 EQZ level 12278.1

acting as an area of SUPCON.

For a while it looked promising but eventually the bears moved price lower. The reasoning behind the trade was that multiple R was possible if price moved back up into the D1 and H1 channels.

This has been observed many times, however on this occasion it didn’t play out as anticipated.

So that’s three losers – again – but the big difference  compared to yesterday is that I’m happy with my reasoning. It’s a wee bit frustrating to not have taken advantage of the strong move down.

12:32

Sell Stop loser -0.26R

For the first ime in ages I setup a Sell Stop PO with the 2R just above the 12331.0 M5 EQZ level. This was based on the pressure that was building up as price broke down through the H1 Bull and Bear channels plus the D1 bull channel.

However, due to the speed it broke through the slipage meant my target was much lower. I trailed my stop and eventually got stopped out for -0.26R.

The trade was based on a breakout which did take place, it just didn’t work out. Trailing my stop meant I didn’t take the full 1R loss 🙂

Sell and Stop Limit PO’s do have their place in a traders arsenal, price did go on to move much lower. 

10:03

GZ M1 Buy MAB loser -1.00R

Took the sell M1 MAB back down to the session low but didn’t work out.

I took the trade because the PW Low was in play and I’d anticipated the 61.8 level BEFORE price had broken down through the PW Low.

I’m happy with the setup compared to the three sell losers from yesterday. I’d argue that 40% of these setups will be winners. It wasn’t the juciest of salmons but I wouldn’t class it as a minnow due to the PW Low.

I was pleased with my patience waiting for the entry and pleased I didn’t move my stop 🙂

Tue 14th Aug

Welcome to the daily DAX commentary where we share with members our unique take on Price Action as the session unfolds. We comment on trade setups that conform to our trading edge and how we use the hybrid Blackbox Trade Controller for MT4.

Use the comments section below to post questions and read what others are saying.

Remember to:

15:20

Learning the lessons……

Today has reminded me of how important it is to:

  • Have zero distractions whilst trading.
  • Follow my trading plan.
  • Be The Bear……

Over the last two weeks I’ve been updating the blog in real-time and also capturing video footage for the website. It’s gone well overall but it does dilute my focus and today I experienced how important it is to ensure my personal trading is the top priority.

Going forward I’ll update the blog when I’m not looking for setups. Distractions can be very subtle and one thing that’s been neglected is keeping my plan etc. in view along with visualization time to keep my mind focussed.

Having three consecutive losers is not what frustrated me, that’s to be expected and so long as we average 2R per trade a 40% strike rate is profitable. It’s the fact they were really poor trades that hurt.

Before entering a trade I need to ask myself the following:

  • Can I talk myself out of this trade.
  • Do I have that feeling of “Whatever the outcome, I’d take this trade again.”

Had these been present I would not have entered any of the trades taken.

I’ve looked at the price action since my three howlers and seen at least two great setups that would have ticked both the above.

Time to focus on the basics before blogging. Let today be one I look back on as a necessary learning experience, a minor speed-bump on the journey 🙂

It’s all about the Golden Zone, finding phi along with great confluence, a.k.a the FIBCON!!

09:04

3 Losers – Zero WTA – WTF!!

I’m currently in a state of shock at what’s just happened!!!

Since the bullish open there were three good buy setups, I  failed to take one of them. I’d been videoing and maybe that affected my focus. Either way it’s not blame for what followed.

When price reversed off the current session high at the  H4 MAB and H1 bear mid-channel I passed on the M1 MAB – Good call!

Then when price spiked down through the H1 EQZ boundary at 12428.2 I went into sell mode and sold the retrace. I then moved my stop – the result was a -1.64R loser.

A poor trade, counter-trend and against order-flow and a 100% Would-Not-Take-Again!

At this point a professional disciplined trader would have either walked away OR managed themselves accordingly.

Emotion took over, I sold again, the trade was in profit at one point, just over 1R but instead of moving my stop to break even or taking the 1R I took the full 1R loss.

I should have walked away BUT no, when price broke below the H1 EQZ again I sold on the micro-retrace, another loser.

None of the trades were:

  • With trend, order-flow.
  • Juicy salmon, all minnows.
  • Buy’s off support, I sold into support.

Right now I’m feeling very frustrated at my trading behaviour, I broke my rules, did not follow my plan and got drawn into choppy price action.

This hurts, I know I’ve made progress in these areas but today is a stark reminder of where I’m at.

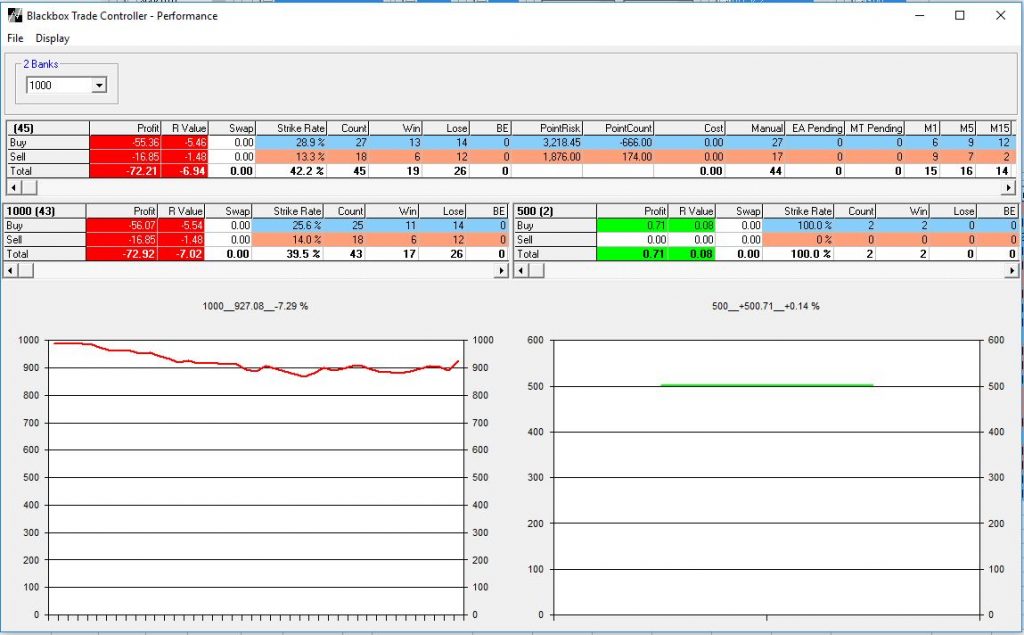
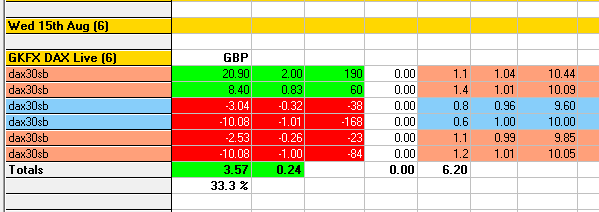
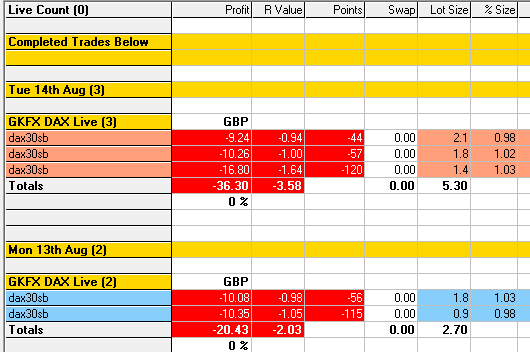
Below are my results for this week so far 🙁

At least yesterday the first loser was a reasoned out M5 MAB, just not the best value option as the M15 MAB just below it was one to take.

The second loser was just a poor trade, I then stopped.

Let today serve as a major milestone lesson on my journey, let the pain I’m feeling right now be transmuted into positive energy 🙂

07:12

GZ M1 Buy MAB after bullish open

What a bullish start!

Price gapped down at 7am to just below the PW Low, this was also a 61.8 level – not shown. It immediately spiked up to setup a very fast GZ M1 MAB as shown.

I wasn’t fast enough to get on this 🙁